
主要内容
搭建一个可以在线写作的博客,无需服务器,无需域名,整个过程自动发布到博客网址。
效果参考我的个人博客:mikeyightub.github.io
既可以自定义相关个性化内容,又可以在线写作,无需下载项目进行部署。
准备条件
- 注册github账号
- 注册travis-ci账号(直接使用github账号登入)
- 注册腾讯云账号
- 注册语雀账号
创建博客
1.通过github注册一个账号,创建一个仓库,仓库名为:你的GitHub用户名.github.io 取这个名字的目的是为了你可以直接通过 xxxxx.github.io 就可以访问你的博客。
2.创建Hexo项目
1
2
3
4
5
6
7
8
9
| # 全菊安装hexo
npm install hexo -g
# 创建项目
hexo init mikeygithub.github.io
# 安装依赖
npm install
# 启动项目
npm run server
# 访问http://localhost:4000查看效果
|
3.主题配置
可以去Hexo官网选择你青睐的博客主题,详细的安装步骤参考具体的相关主题文档。笔者采用的是Fuild主题。
1
2
3
| # 进入项目目录安装主题 你可以选择其他主题(具体去)
npm install --save hexo-theme-fluid
# 配置一堆扒拉扒拉
|
部署项目
部署博客项目到Github即可通过在线进行访问
1.保存项目到GitHub,第一次推送时需要进行设置。
1
2
3
4
5
6
7
8
9
10
| # 在项目根目录初始化
git init
# 设置远程仓库
git remote add origin https://github.com/mikeygithub/mikeygithub.github.io.git
# 添加
git add .
# 提交信息
git commit -m 'Init commit'
# 提交项目
git push origin src
|
注意:笔者的存放方式是src存储博客的源码,master分支存储的是部署后的博客页面
2.配置 _config.yml
1
2
3
4
5
6
| deploy:
- type: git
# 部署到的仓库
repo: https://github.com/mikeygithub/mikeygithub.github.io
# 部署到的分支
branch: master
|
3.部署博客到Github-page
1
2
3
| # 项目根目录输入
hexo deploy
# 输入GitHub用户名密码即可完成部署
|
4.查看效果 访问
如果你走到了这一步,你已经很棒了,但是我们发现个问题,就是我们每次写完都需要进行保存到github的src分支,部署到master分支,接下来我们将实现提交源代码自动进行部署。
持续集成
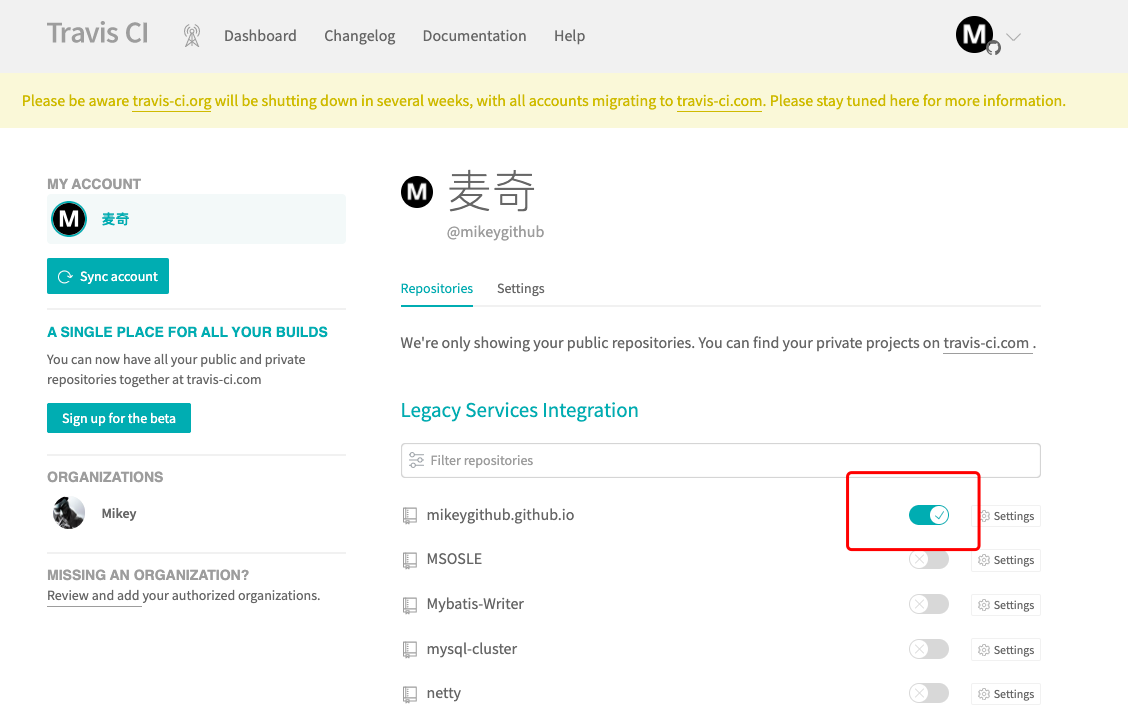
持续集成采用Travis-CI,你需要先去官网注册一个账号,然后开启你需要持续集成的账号。
1.注册travis-ci账号并且导入github相关项目、将其持续集成开关打开。
2.设置参数
1
2
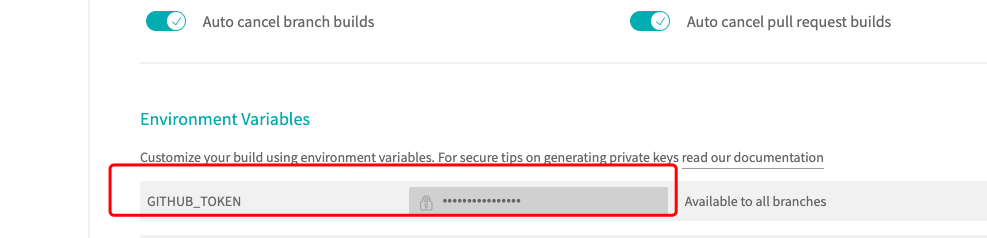
| 前往 GitHub 新建 Personal Access Token,只勾选 repo 的权限并生成一个新的 Token。Token 生成后请复制并保存好。
回到 Travis CI,前往你的 repository 的设置页面,在 Environment Variables 下新建一个环境变量,Name 为 GITHUB_TOKEN,Value 为刚才你在 GitHub 生成的 Token。确保 DISPLAY VALUE IN BUILD LOG 保持 不被勾选 避免你的 Token 泄漏。点击 Add 保存。
|
3.在你的 Hexo 站点文件夹中新建一个 .travis.yml 文件:
1
2
3
4
5
6
7
8
9
10
11
12
13
14
15
16
17
18
| sudo: false
language: node_js
node_js:
- 10 # use nodejs v10 LTS
cache: npm
branches:
only:
- master # build master branch only
script:
- hexo generate # generate static files
deploy:
provider: pages
skip-cleanup: true
github-token: $GITHUB_TOKEN
keep-history: true
on:
branch: master
local-dir: public
|
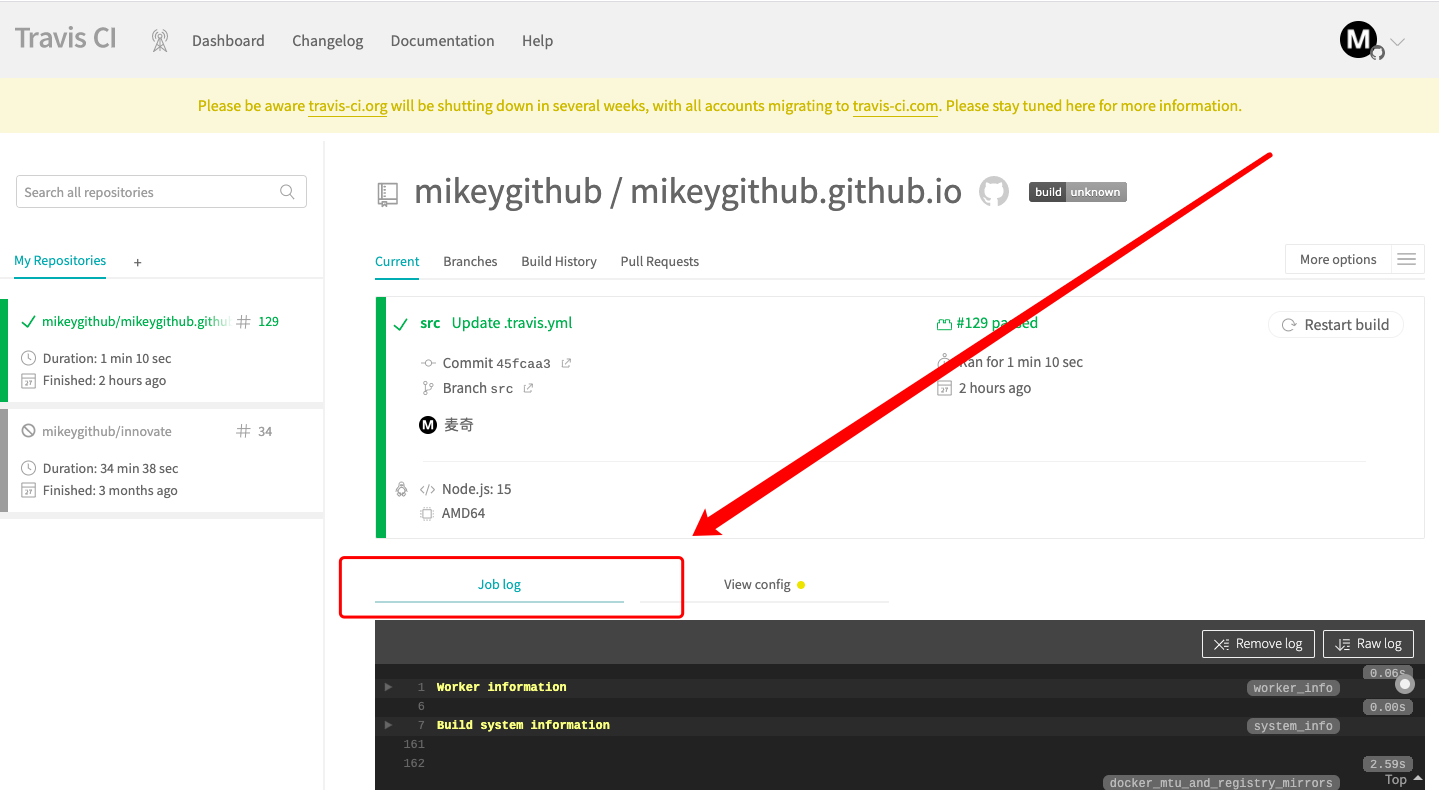
4.将.travis.yml推送到 repository 中。Travis CI 应该会自动开始运行,并将生成的文件推送到同一 repository 下的gh-pages分支下。
5.稍等片刻,让子弹飞一会,我们就可以去查看我们的博客更新了。如果发现并没有更新,可以查看日志排查原因。
如果你把这一步也顺利走完了,那恭喜你又省了一步操作。我们发现我们的博客目前存在的问题是无法在线进行编写,每次都是需要本地编写推到GitHub自动部署,好,那我们接下来就实现云端写作的功能。
在线写作
实现思路

实现步骤
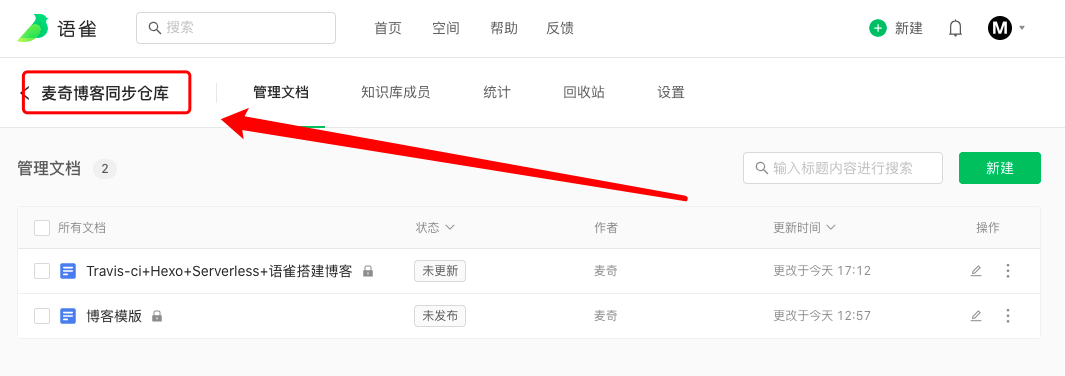
1.注册语雀账号并且创建一个知识库专门做为同步到博客的仓库。
2.获取 Travis-CI的访问token
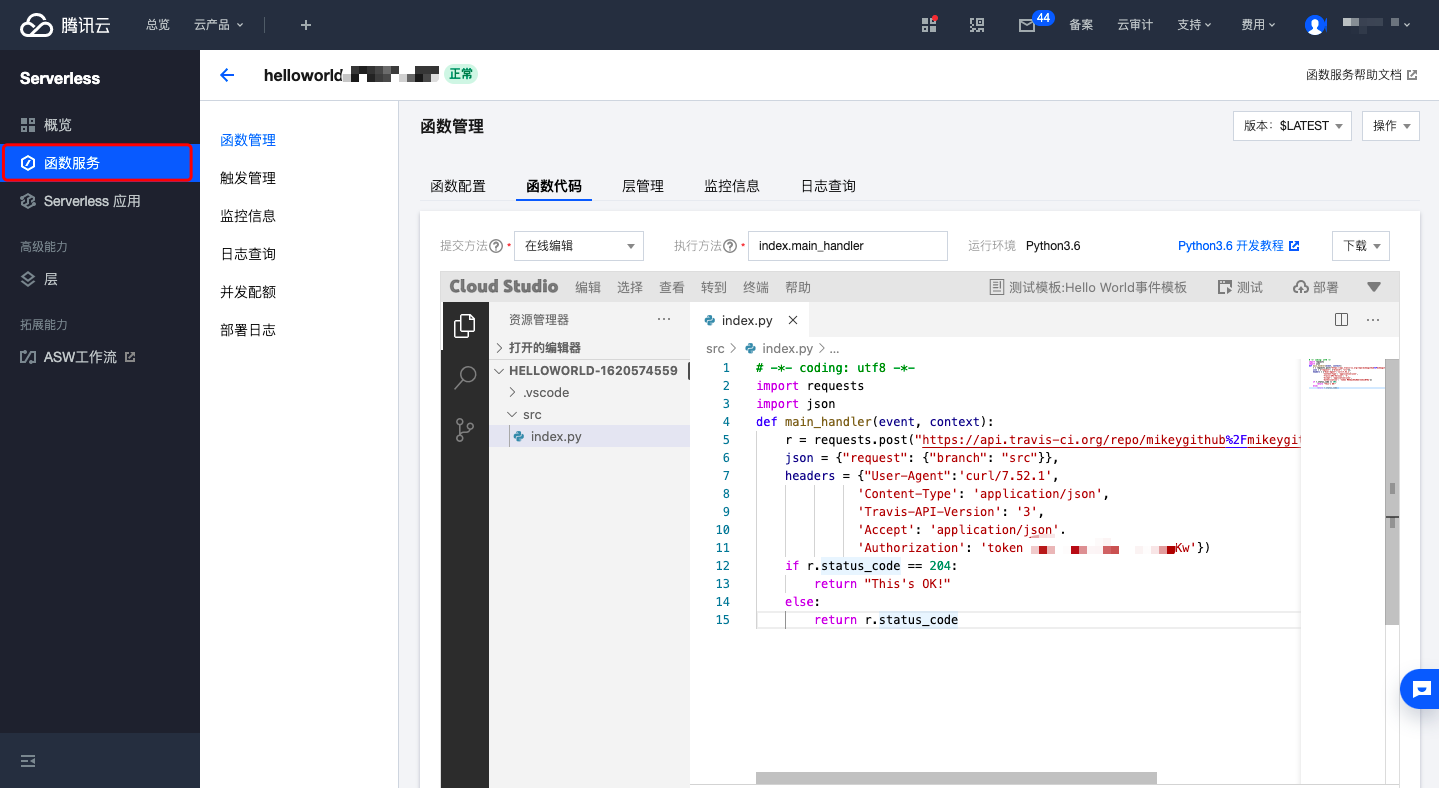
 3.编写触发Travis-CI的Serverless函数,在腾讯云创建一个账号并且创建一个云函数。云函数的内容如下:
1
2
3
4
5
6
7
8
9
10
11
12
13
14
15
|
import requests
import json
def main_handler(event, context):
r = requests.post("https://api.travis-ci.org/repo/mikeygithub%2Fmikeygithub.github.io/requests",
json = {"request": {"branch": "src"}},
headers = {"User-Agent":'curl/7.52.1',
'Content-Type': 'application/json',
'Travis-API-Version': '3',
'Accept': 'application/json',
'Authorization': 'token 第二步复制出来的token'})
if r.status_code == 204:
return "This's OK!"
else:
return r.status_code
|
如下图所示
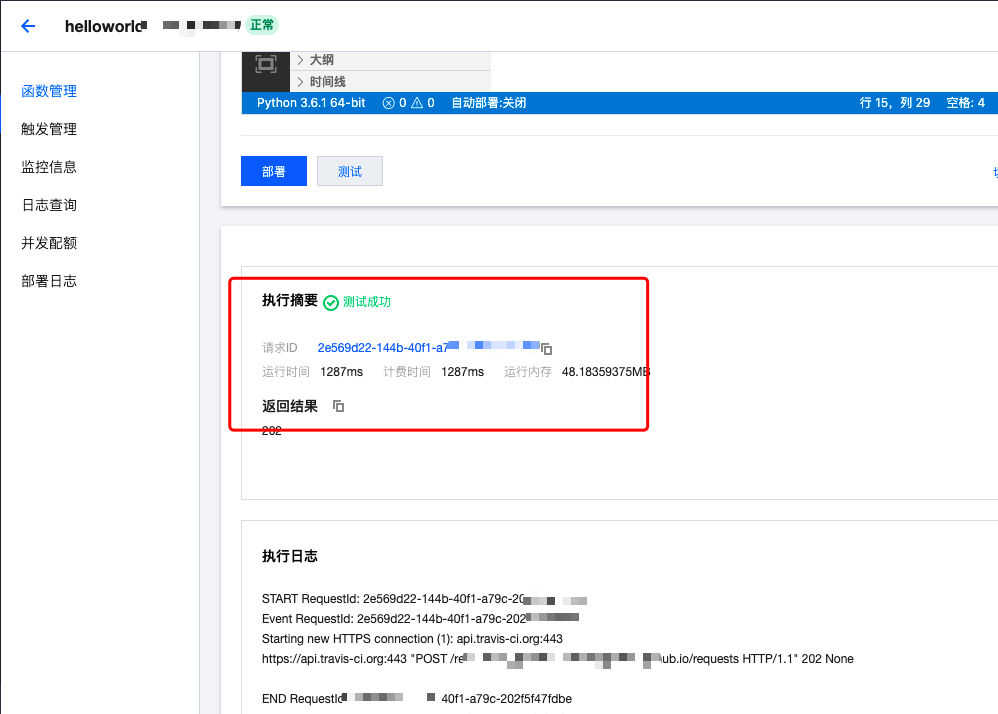
使用测试,返回响应成功去查看一下
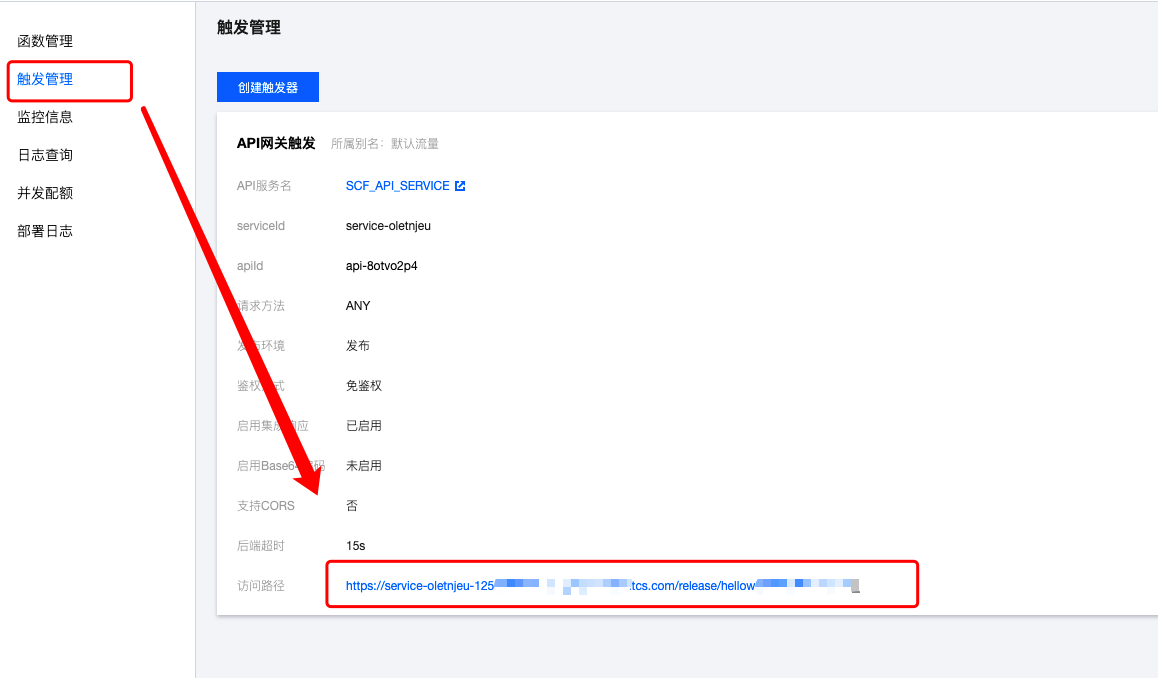
创建触发器,将函数发布,复制该函数的访问地址
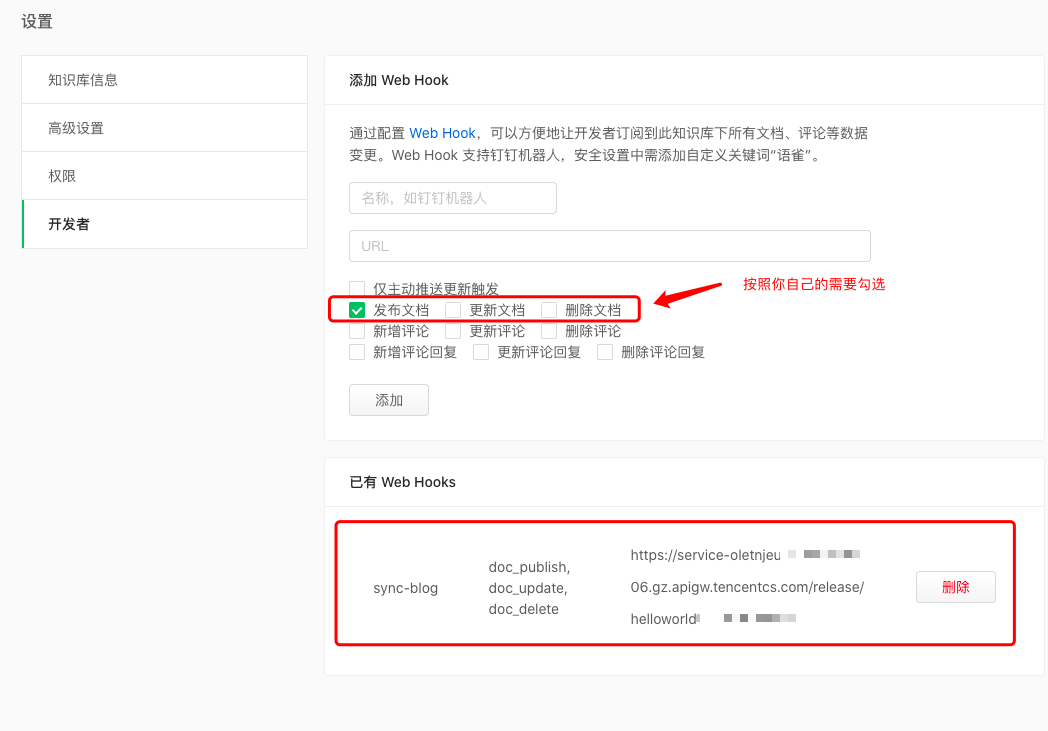
- 配置语雀webhook,将我们上一步复制出来的访问路径粘贴到URL那栏,设置名字以及在什么场景下触发。
5.安装拉取语雀知识库文章插件(yuque-hexo)
5.1安装插件
5.2配置package.json
1
2
3
4
5
6
7
8
9
10
11
12
13
14
15
16
17
18
19
20
21
22
23
24
25
26
27
28
29
30
31
32
33
34
35
36
37
38
39
40
41
42
43
44
| {
"name": "hexo-site",
"version": "0.0.0",
"private": true,
"scripts": {
"sync": "yuque-hexo sync", # 注意这里添加这两个配置
"clean:yuque": "yuque-hexo clean",
"build": "hexo generate",
"clean": "hexo clean",
"deploy": "hexo deploy",
"server": "hexo server"
},
"hexo": {
"version": "5.2.0"
},
"yuqueConfig": { # 配置项
"postPath": "source/_posts/yuque",
"cachePath": "yuque.json",
"mdNameFormat": "slug",
"adapter": "hexo",
"concurrency": 5,
"baseUrl": "https://www.yuque.com/api/v2",
"login": "aichihongdouheyumi", # 这个是你的语雀仓库的路径名称,具体查看浏览器路径
"repo": "blog",
"token": "xxxxxxx", # 你的语雀token
"onlyPublished": true,
"onlyPublic": true
},
"dependencies": {
"hexo": "^5.0.0",
"hexo-blog-encrypt": "^3.1.6",
"hexo-generator-archive": "^1.0.0",
"hexo-generator-category": "^1.0.0",
"hexo-generator-index": "^2.0.0",
"hexo-generator-tag": "^1.0.0",
"hexo-renderer-ejs": "^1.0.0",
"hexo-renderer-marked": "^3.0.0",
"hexo-renderer-stylus": "^2.0.0",
"hexo-server": "^2.0.0",
"hexo-tag-aplayer": "^3.0.4",
"hexo-theme-fluid": "^1.8.6",
"yuque-hexo": "^1.7.0"
}
}
|
5.3配置.travis.yml
1
2
3
4
5
6
7
8
9
10
11
12
13
14
15
16
17
18
19
20
21
22
23
24
25
26
27
| sudo: false
language: node_js
node_js:
- 15
cache: npm
branches:
only:
- src
script:
- yuque-hexo clean
- yuque-hexo sync
- hexo generate
deploy:
provider: pages
skip-cleanup: true
github-token: "$GITHUB_TOKEN"
keep-history: true
target-brach: master
on:
branch: src
local-dir: public
notifications:
email:
- biaogejiushibiao@qq.com
on_success: change
on_failure: always
|
配置完成将其提交到你的github仓库。
5.4 在你的语雀仓库中新建一篇文章,稍等一会,该文章将自动同步到博客上。
5.5 文章模版
1
2
3
4
5
6
7
8
9
10
11
| ---
title: 博客标题
index_img: 'https://cdn.jsdelivr.net/gh/mikeygithub/jsDeliver@master/img/banner.jpg'
hide: false
password: ''
date: 2021-05-09 17:24:22
tags: teamcity
categories: [teamcity,devops]
---
|
注意:语雀不要开启保存并发布,否则无法触发webhook
参考资料
https://github.com
https://hexo.io/zh-cn/docs/
https://github.com/x-cold/yuque-hexo
如果在搭建过程中遇到问题,可以在评论中写出,也可以通过下方二维码联系我

扫一扫、关注我
